[intro paragraph - include why it is cooler/better to not use generators; as well as give an intro on what exactly Pokemon card faking is.]
What Is There To It?
What actually is there to faking? What does it involve/what is the process (grabbing a blank, putting on some text and symbols, and dropping some art). What do you need to begin (blanks, fonts, symbolsheet, image editing program), in short.
Finding the Right Program and Fonts
Two main alternatives - Photoshop/GIMP. Mention why your typical Paint is generally a bad option. Link etc. Paragraph from the old thread looks pretty good.
List Blui's font pack and state why it is important to use the right fonts.
Choosing Your Era
Introduction/paragraph on the eight main types of eras and perhaps what makes each different/each era of blanks different
Blanking Out With Symbols
Each era has its own set of blanks with its own set of symbols. We've listed the most recently updates blanks we suggest you to use. Mention that the community is constantly working on improving old blanks. Mention that blanks should not be edited unless the owner gives permission.
Classic Era
Neo Era
e-Card Era
EX Series
DPPt Series
HGSS Series
BW Era
XY Era
Custom Blanks
Putting It Together
Everything - from the attack effects to the Retreat Cost - a placed in a specific spot on the card. Explain why placements are important (i.e. they make the card look neat and professional, and well set out). Link to Jabber's guide. Link to any font guides made for each era.
The Extras
What are these holosheets and how are they used? Why do I use them?
Backgrounds + art (especially the importance of crediting the artists)
Advanced Stuff & Further Resources
Basically everything that doesn't belong up there ^. Wording guides, AT guide,
FAQ
Q: I've made a card, but what do I do now?
Q: I've got a question not answered here! Where should I ask?
Special Thanks To...
- Person, for XXX
--> I'd mention the fakers who have really help make the community separately or emphasise them a bit more
Short update in regards to the progression of the project for today. @Athena is on board with doing all the major formatting and creating of the main threads, which is great to see. At this point, we're looking at having the TCG Wording Resource and the Common TCG Attacks Resource in their own separate threads to the revamped thread. We're also thinking that the thread will be systematic according to era so fakers don't have to trundle through the excess era stuff that they don't really need. Eitherway, Ahena is looking at posting a draft/idea/outline for what she has envisioned the thread to be over the next few days.
As a general thing, people more experienced in faking would need to assist Athena in writing the paragraphs and some other written pieces for the thread. I'll be putting my hand up for that, and if anyone else is too, just let Blui or myself know!
Anyways, I'm hoping to get general structure of the thread OP completed by February 21st for the launch a week after. It'd be great to also get the bulk of the writing either tasked or completed by this point. Also, once there is a Google Doc for the OP made, I'll be sharing it with you guys!
If you're having a wording guide (which I assume is the case based off my understanding of the above post), will it differentiate between eras? Because wording is different in different eras of cards (and frankly that's annoying because the only tangible cards I have are Ex/DPPt/HGSS era).
You've asked about writing paragraphs for the thread. Would you be able to explain what you meant by that? I'd love to help out here, but I don't want to say "yeah I can do this" if it turns out I can't.
(Or maybe I've come in here at a totally inappropriate time and now look ridiculous)
Just to keep you guys updated, I did indeed make a very rough organizational draft that I shared with the project managers. I'll be working on that on and off over the next couple weeks or so, but the first step was put down today, woohoo! \o/
If you're having a wording guide (which I assume is the case based off my understanding of the above post), will it differentiate between eras? Because wording is different in different eras of cards (and frankly that's annoying because the only tangible cards I have are Ex/DPPt/HGSS era).
You've asked about writing paragraphs for the thread. Would you be able to explain what you meant by that? I'd love to help out here, but I don't want to say "yeah I can do this" if it turns out I can't.
(Or maybe I've come in here at a totally inappropriate time and now look ridiculous)
The wording guide at present is for XY only, though if people know what differences there are between specific era wording, there could be a smaller section for major era wording differences. I'll shoot you over the passwords if you're interested in looking through the master doc for everything and for wording.
For writing paragraphs, you can sorta see what paragraphs I mean on this sketch-draft. It'd be a bit of a "this is what this is and why we use it" for most paragraphs, but for paragraphs describing eras and their differences, you'll be more writing on what I just mentioned.
Also you've got Skype right? If you'd like and you have it, just send me a PM with your username and I'll friend you + add you to the Resources Revamp Skype chat.
I don't remember my Skype username lol. It logs itself in and that's how I use it. God help me if MS should ever change that (or not, since I truly only use it once in a blue moon. It just sits there and wastes processor power otherwise but whatevs). I'll PM you my name when I find it.
In that case, the wording guide should be thrown out and restarted to include relevant wording for all Eras! What should be done is there should be a separate guide for all eras and a main guide that applies more or less everywhere. I can probably write a wording guide for D/P/Pt. since I've been clinging to that era (GOLDEN AGE OF POKÉMON) for like, 10 years now. Around 80% of my cards are from D/P/Pt. and the remaining 20% are HL-PK, HG/SS, or promotions for B/W. Muh gen IV. But yeah if you need a wording guide for D/P/Pt. I'm here for you hermano.
I guess I can make contributions to writing those paragraphs then. I assume they are located on your master google doc, so I guess yeah send me the passwords.
I don't remember my Skype username lol. It logs itself in and that's how I use it. God help me if MS should ever change that (or not, since I truly only use it once in a blue moon. It just sits there and wastes processor power otherwise but whatevs). I'll PM you my name when I find it.
If you're using desktop, you can just click your profile pic and should send you to your account page, which has your username.
In that case, the wording guide should be thrown out and restarted to include relevant wording for all Eras! What should be done is there should be a separate guide for all eras and a main guide that applies more or less everywhere. I can probably write a wording guide for D/P/Pt. since I've been clinging to that era (GOLDEN AGE OF POKÉMON) for like, 10 years now. Around 80% of my cards are from D/P/Pt. and the remaining 20% are HL-PK, HG/SS, or promotions for B/W. Muh gen IV. But yeah if you need a wording guide for D/P/Pt. I'm here for you hermano.
Anyways, I'm a bit two-minded about having multiple documents for era wording, as it can get a bit cluttered/messy I guess and it sounds like a bit of work for both the creation and the setout. Having a master post could be a bit confusing too, as you have to look at that and then look at your respective era, as well as sort out which wording is the same across all eras and the like. Also, because the majority of fakers will be using XY wording, it may be better to just stick that as a default and make a post afterwards with major wording differences. Eitherway, feel free to add to the current Master Wording doc and add some specific-era wording, though remember to specify that is for the particular era.
@Nod3, it sounds like we may end up getting you to help in writing paragraphs that describes each separate era of faking and their uses for the final thread. You and @Athena should probably discuss that in more details.
Another update for the current progress of the OP. Things are progressing well. We've pretty much decided the format of the thread, which is good news. We are looking at having three main individual OPs in the main resources thread. The first will have the Introduction and the Resources sections, the second will have the Tutorials (or links) and the third will have the FAQ and the Credits. Speaking of the FAQ, we need some questions! If you've got an idea for a question, add it to our draft FAQ found here and make a note of it in this thread.
A bit of a bigger notice, we're moving the deadline to the 4th of March as it gives some time to clean any unexpected things up if need be.
Another thing to look out for is a banner competition coming some time this week! We'll be getting you guys and anyone else following this thread to have a shot at making the banner for the thread if you so wish, to be chosen by the project heads, so keep your next week free if you would like to do that.
Anyways, that's the update for Week 9! Happy faking!
In light of our considerable progress and accomplishments with revamping the resources and help thread, and as we move towards our final week of the project, we felt the need to end things with a bang!
Starting now! Yes, now! We're hosting a mini-banner contest to see who can create the most creative and professional banner, which will be hosted as the main banner for the new resources and help thread. Below are the rules and requirements for this competition. MAKE SURE TO READ IT OVER!
Rules/Requirements:
1. The banner must be your own creation
2. Do NOT steal someone else's work and claim is as your own. You will be disqualified and banned
3. You’re free to use official artwork (includes art from the covers of the manga) and your own/partner’s art, but not someone else’s fanart
4. Use dimensions 750 x 300
5. Text should read “FAKING RESOURCES AND HELP” (all caps, no quotes)
6. Post your submission directly within this thread
7. Submissions after the deadline or failure to follow proper dimensions or text will not be considered
You may work individually or as partners. You’re free to make a post within this thread notifying others that you’re available for partnering up.
With such an extensive variety of resources available, jumping straight into image faking can be a bit daunting. It may be the prospect of attempting a new hobby, the burden of creating an official-looking card, or maybe you’re just unsure on where to start. Whatever it may be, this tutorial will guide you in making your very own, standard Pokémon TCG image fake.
Step 1: Choose your image editor software. If you can afford it, Photoshop is great for image faking due to its grand versatility. GIMP is the free alternative, capable of most Photoshop features and is suitable for faking. I’ll be using Corel PhotoPaint, yet another image editor software, throughout this tutorial. Interface and tools should look similar in all three software. It may be tempting to use the Paint program probably already installed on your computer, however it lacks many capabilities essential for effective image faking.
Step 2: Choose your era. There are seven main eras in the PTCG - Classic, Neo, E-Card, EX, DPPt, HGSS, BW and XY. The era you choose defines the wording style, the power levels and, generally, the resources you choose to use later on. The card I’ll be making in this tutorial will be of the XY era, as it is the era I am most familiar with.
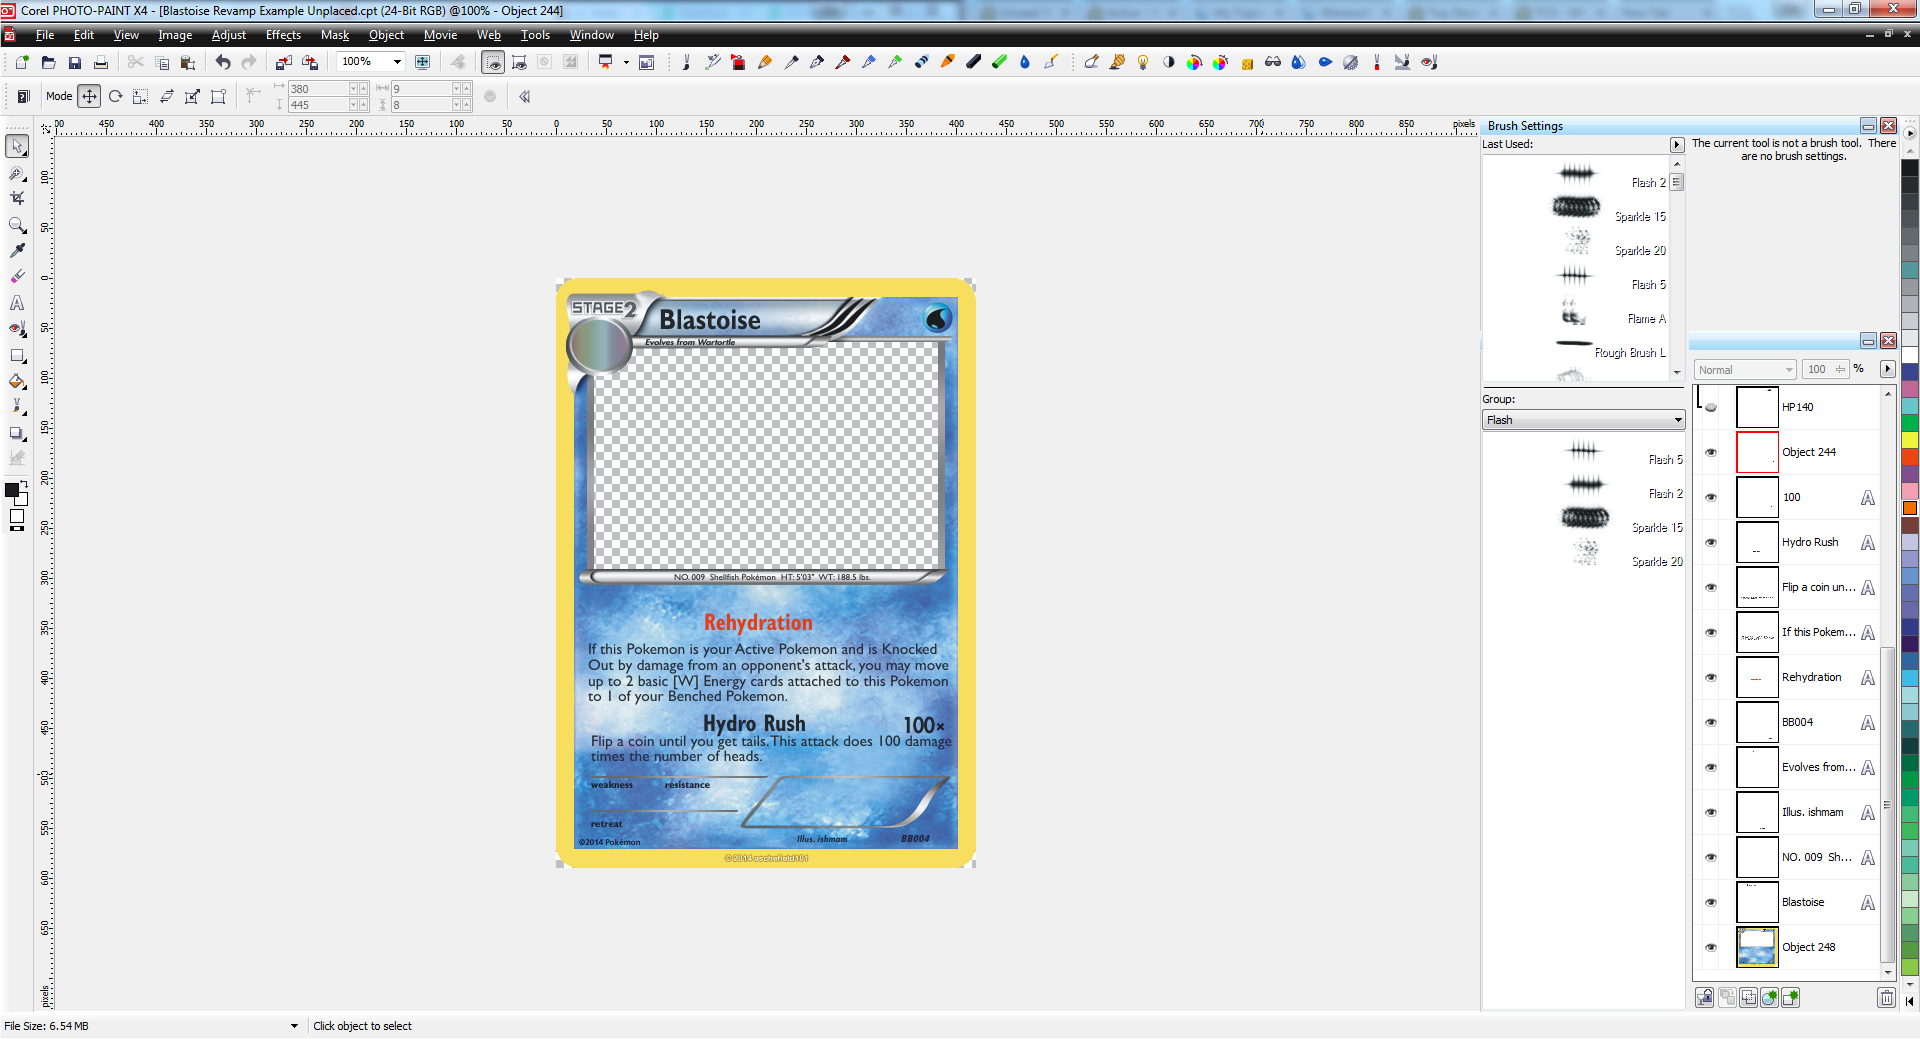
Step 3: Design your spoiler. That is, design what will actually go on your card! This is where you choose the Pokémon, type, HP, attacks, retreat cost and the like. For officialism, try to avoid the 400 HP monsters that do 200 damage for a single [C]. Try to keep everything including HP, attacks and retreat cost realistic. Don’t forget your Pokédex details! You may like to refer to other official cards, especially cards of the same Pokémon, as well as our TCG Wording Guide and Common Attack Effects resources.
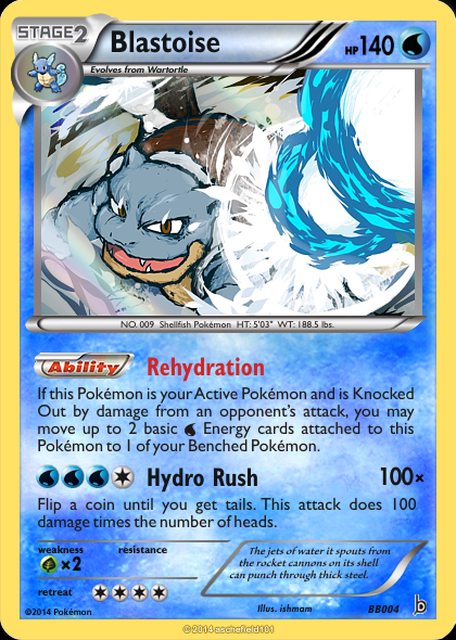
For this tutorial, I’ll be using the following spoiler:
Blastoise - Water - HP140
Stage 2 - Evolves from Wartortle
NO. 009 Shellfish Pokémon HT: 5'03" WT: 188.5 lbs.
Ability Rehydration
If this Pokémon is your Active Pokémon and is Knocked Out by damage from an opponent’s attack, you may move up to 2 basic [W] Energy cards attached to this Pokémon to 1 of your Benched Pokémon.
[W][W][W][C] Hydro Rush 100x
Flip a coin until you get tails. This attack does 100 damage times the number of heads.
Weakness: Grass (x2)
Resistance:
Retreat: [C][C][C][C]
The jets of water it spouts from the rocket cannons on its shell can punch through thick steel.
Step 4: Choose and download your blanks and other resources. You will likely end up using the blank that belongs to the era you chose in Step 2, however there are also a bucketload of custom blanks you may like to try out. Download the blank you choose. Then, you’ll need to download the resources - the symbol sheet, fonts and, optionally, the holosheet - that corresponds with your blank of choice. To install the fonts, extract the font pack and follow this guide for Windows (see the tip) or this guide for Macintosh. For this tutorial, I’ll be using the XY resources that corresponds to the XY era.
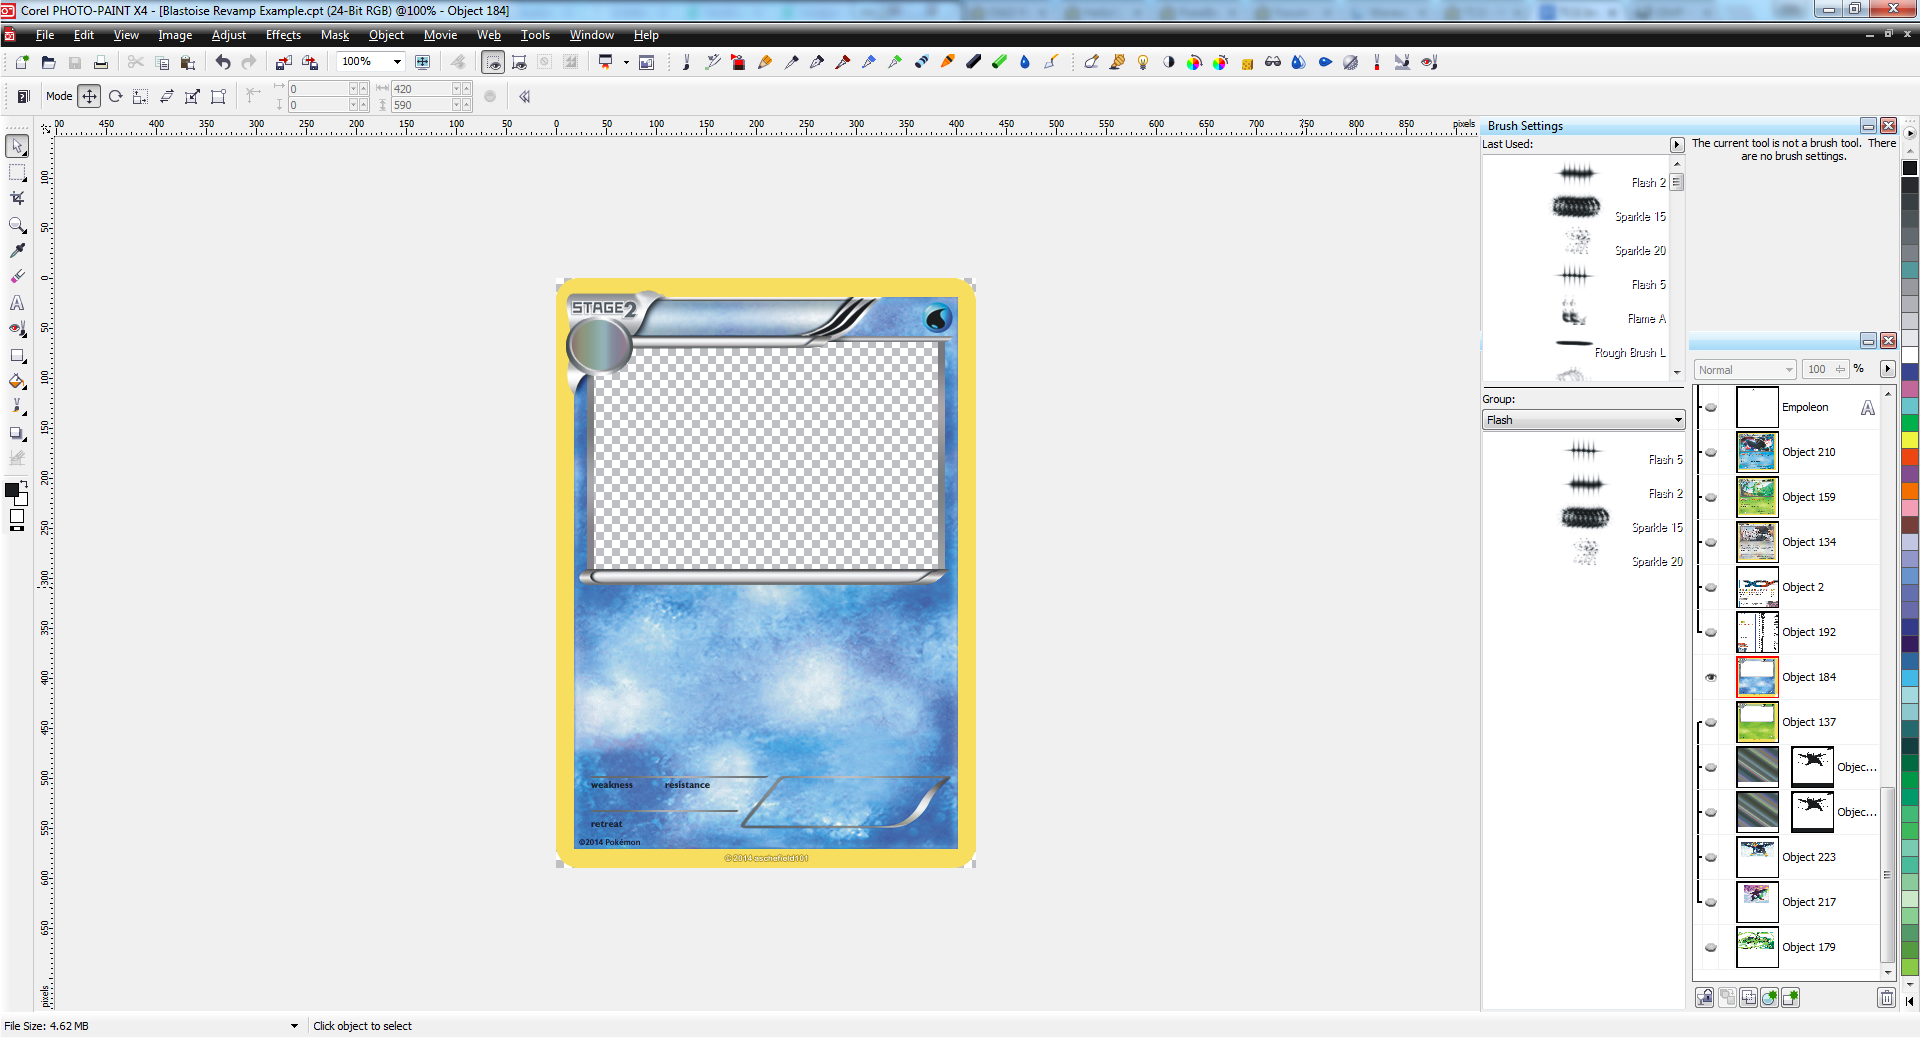
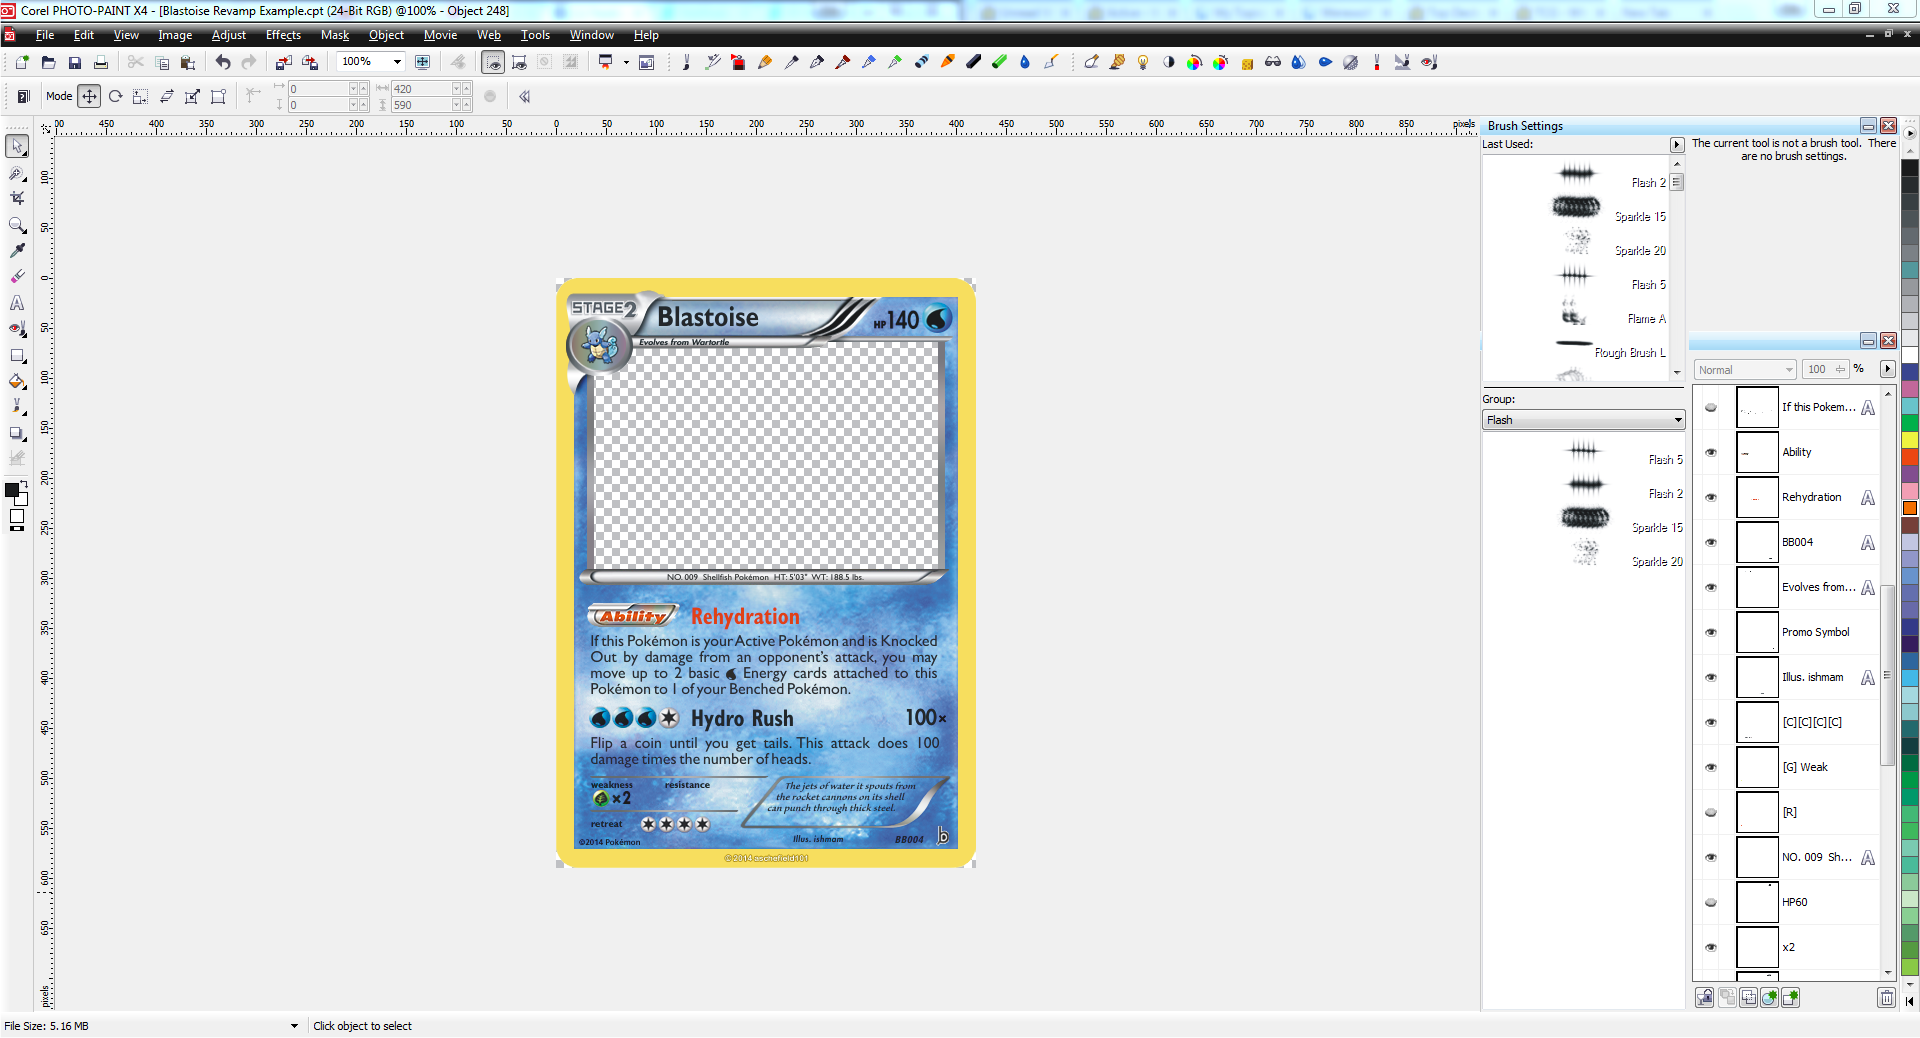
Step 5: Open your blank in your image editor. This step is pretty straight forward. My personal preference is to open the blank with the image editor and then save it as a new document.
Step 6: Add in the text. This is where the fun begins! You may want to download a font guide for this step and fill in the text that way. Otherwise, select your Type tool and click anywhere on the card. This should open a box where you can begin typing your text. Change the text to the correct font and an approximate size. Fonts are normally the same across all eras, so as a general rule this guide is a good font reference. Once you’ve got the text looking about right, move it to the rough position of where it will be in the final product. Don’t worry about getting it perfect at this stage - you’ll fix it up later. Once you’ve added all the text you need, move onto the next step.
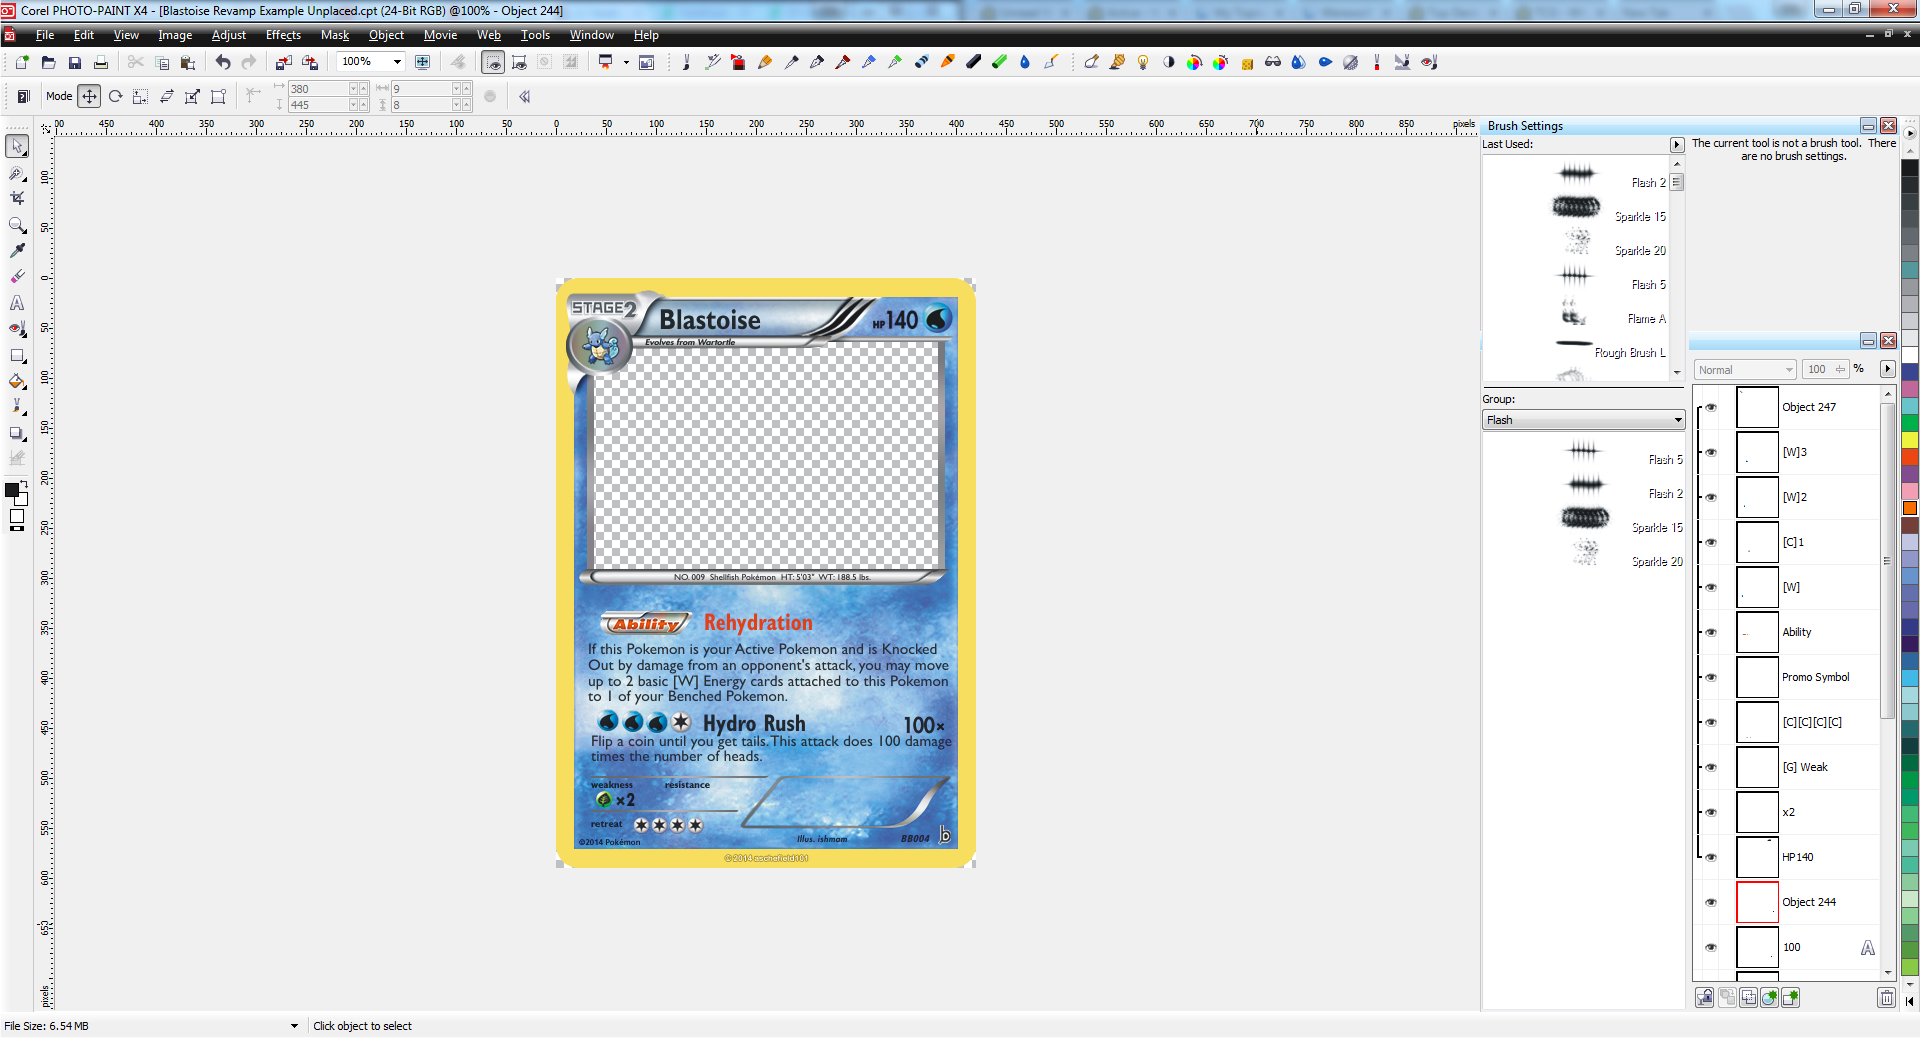
Step 7: Add in the symbols. Adding the symbols is a process similar to adding the text. Firstly, you’ll need to import the symbol sheet into your workspace. You’ll then need to cut out each symbol you need. This will include any Energy symbols, the rarity symbols and, depending if you added it as text or not, the HP. Once again, roughly positions the symbols but don’t worry about perfection, as that’ll be fixed up later. Once all symbols are added, move onto the next step.
Step 8: Positioning, like, everything. This is probably one of the most time consuming parts of image faking. Making sure everything is the right size, the right font and in the right position is vital in ensuring your card looks not only neat and tidy, but also official. Using a software-specific font guide will make things much quicker. Otherwise, Jabberwock has written a detailed guide for do-it-yourself placements which you can find here.
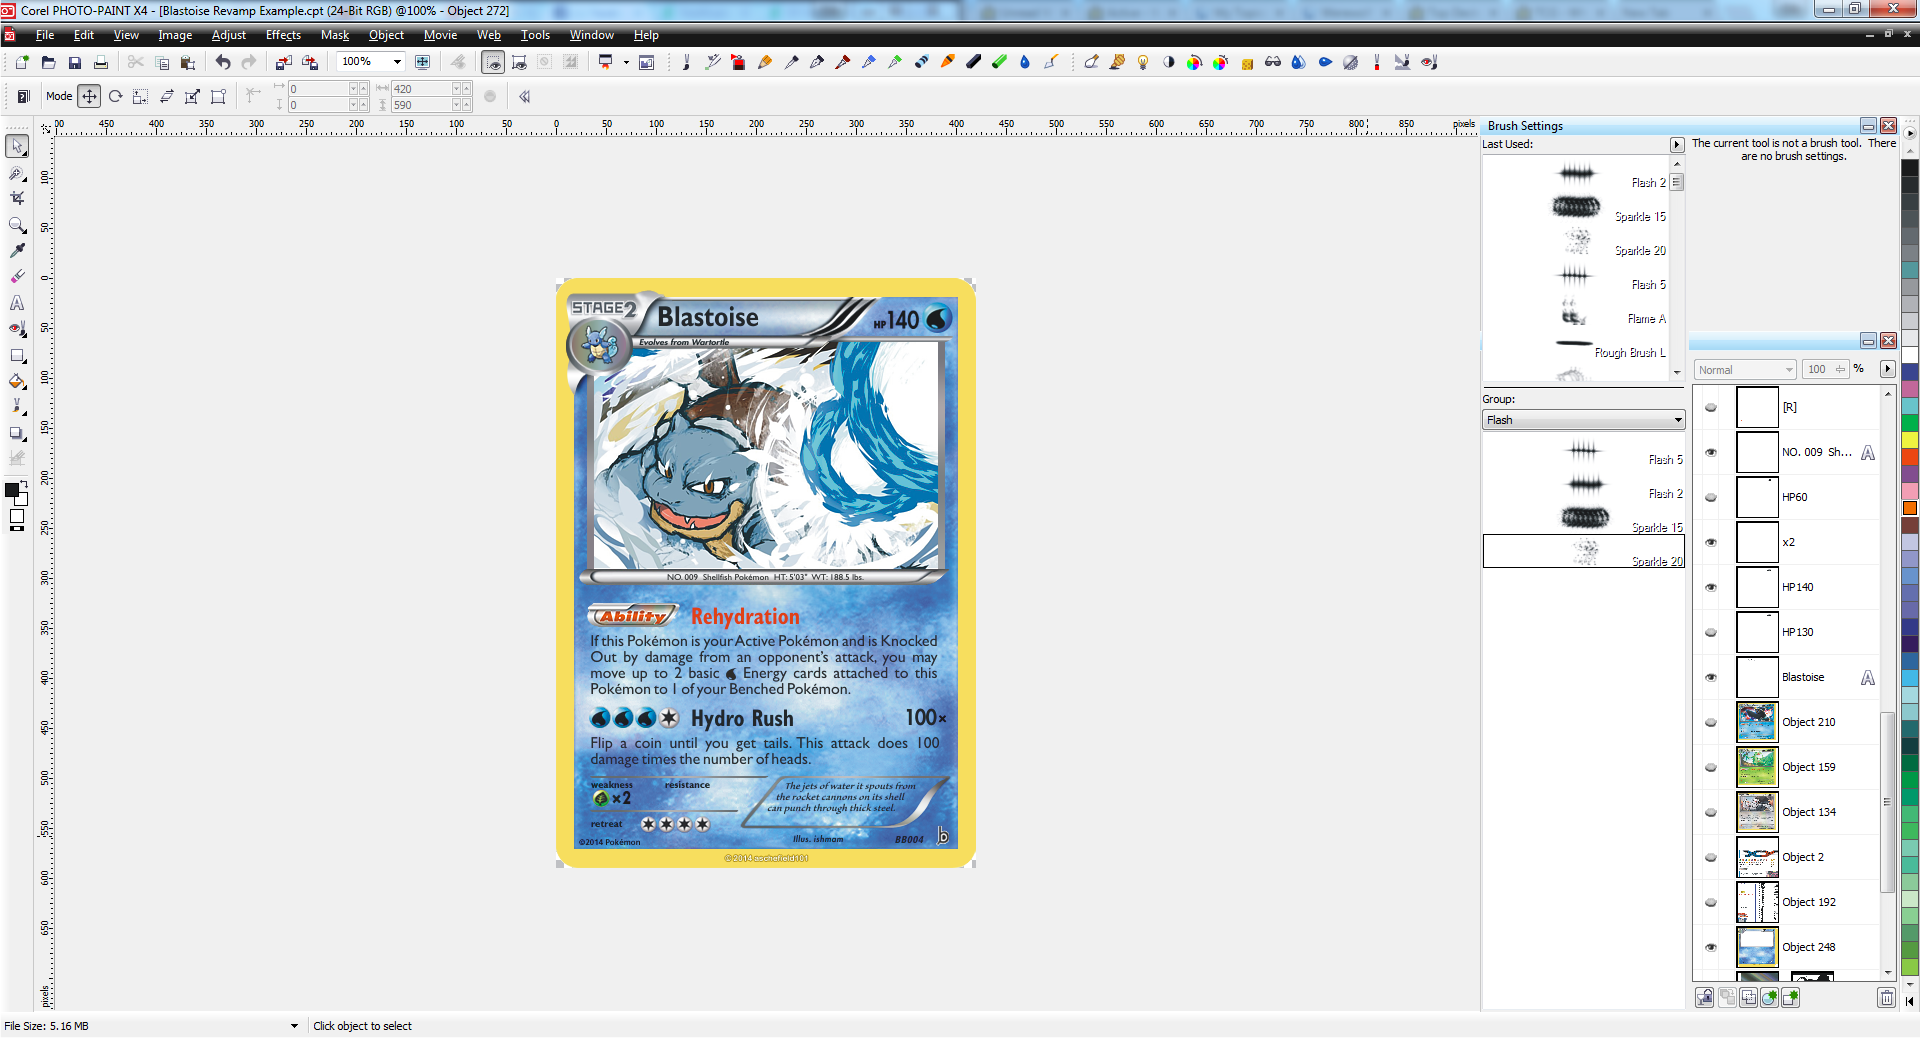
Step 9: Choose and add your art! Art is one of the selling points of your card, so choose wisely! Check out PB’s very own Smeagle’s Canvas for fan art pieces, otherwise you may like to search Google for some official Pokémon art or look around DeviantArt for fan art. Unless art is official Pokémon material, always make sure you have the artist’s permission to reproduce the piece in your card. You must also make sure you have the illustration credit on the card, just like official cards. Not crediting the artist is plagiarism and will result in immediate removal from PB, and even other sites at their discretion. For this example, I will be using this nifty Blastoise piece by ishmam. You can see the artist lists his permissions on this page, however you will often need to ask the artist for permission directly.
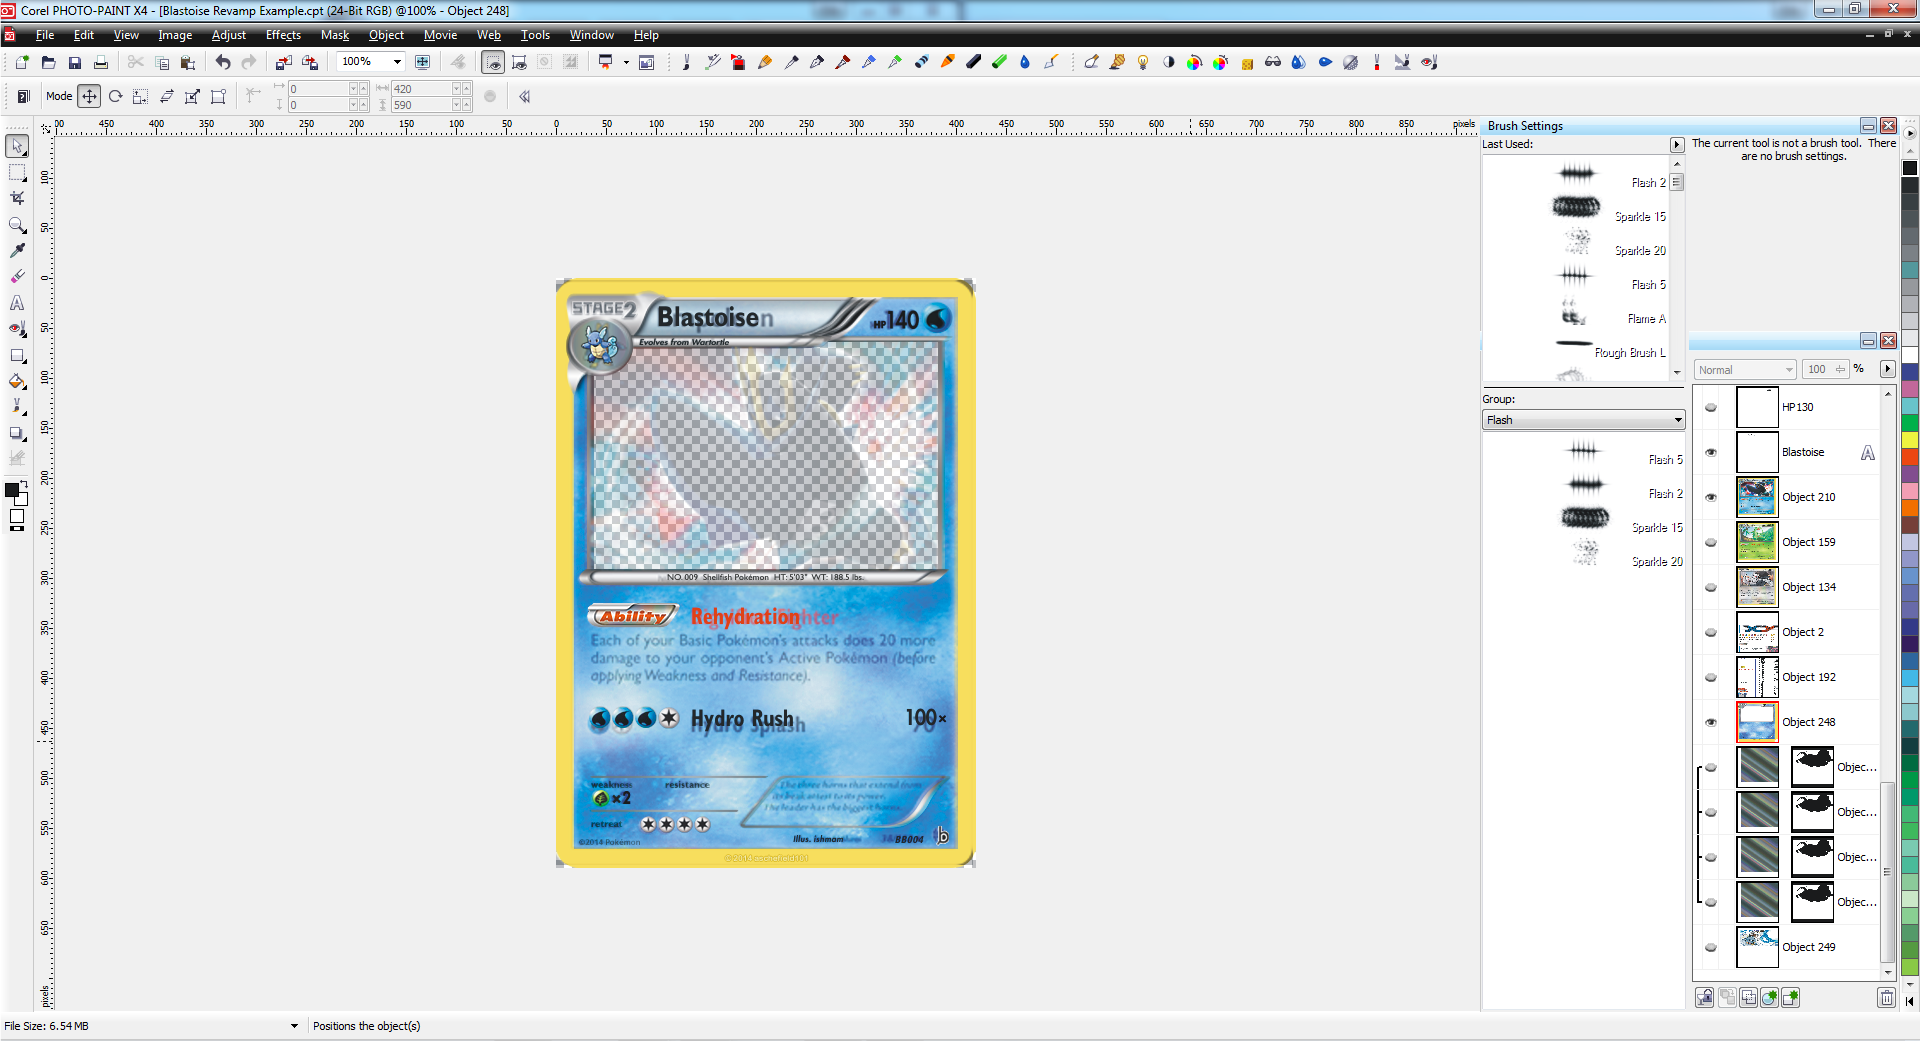
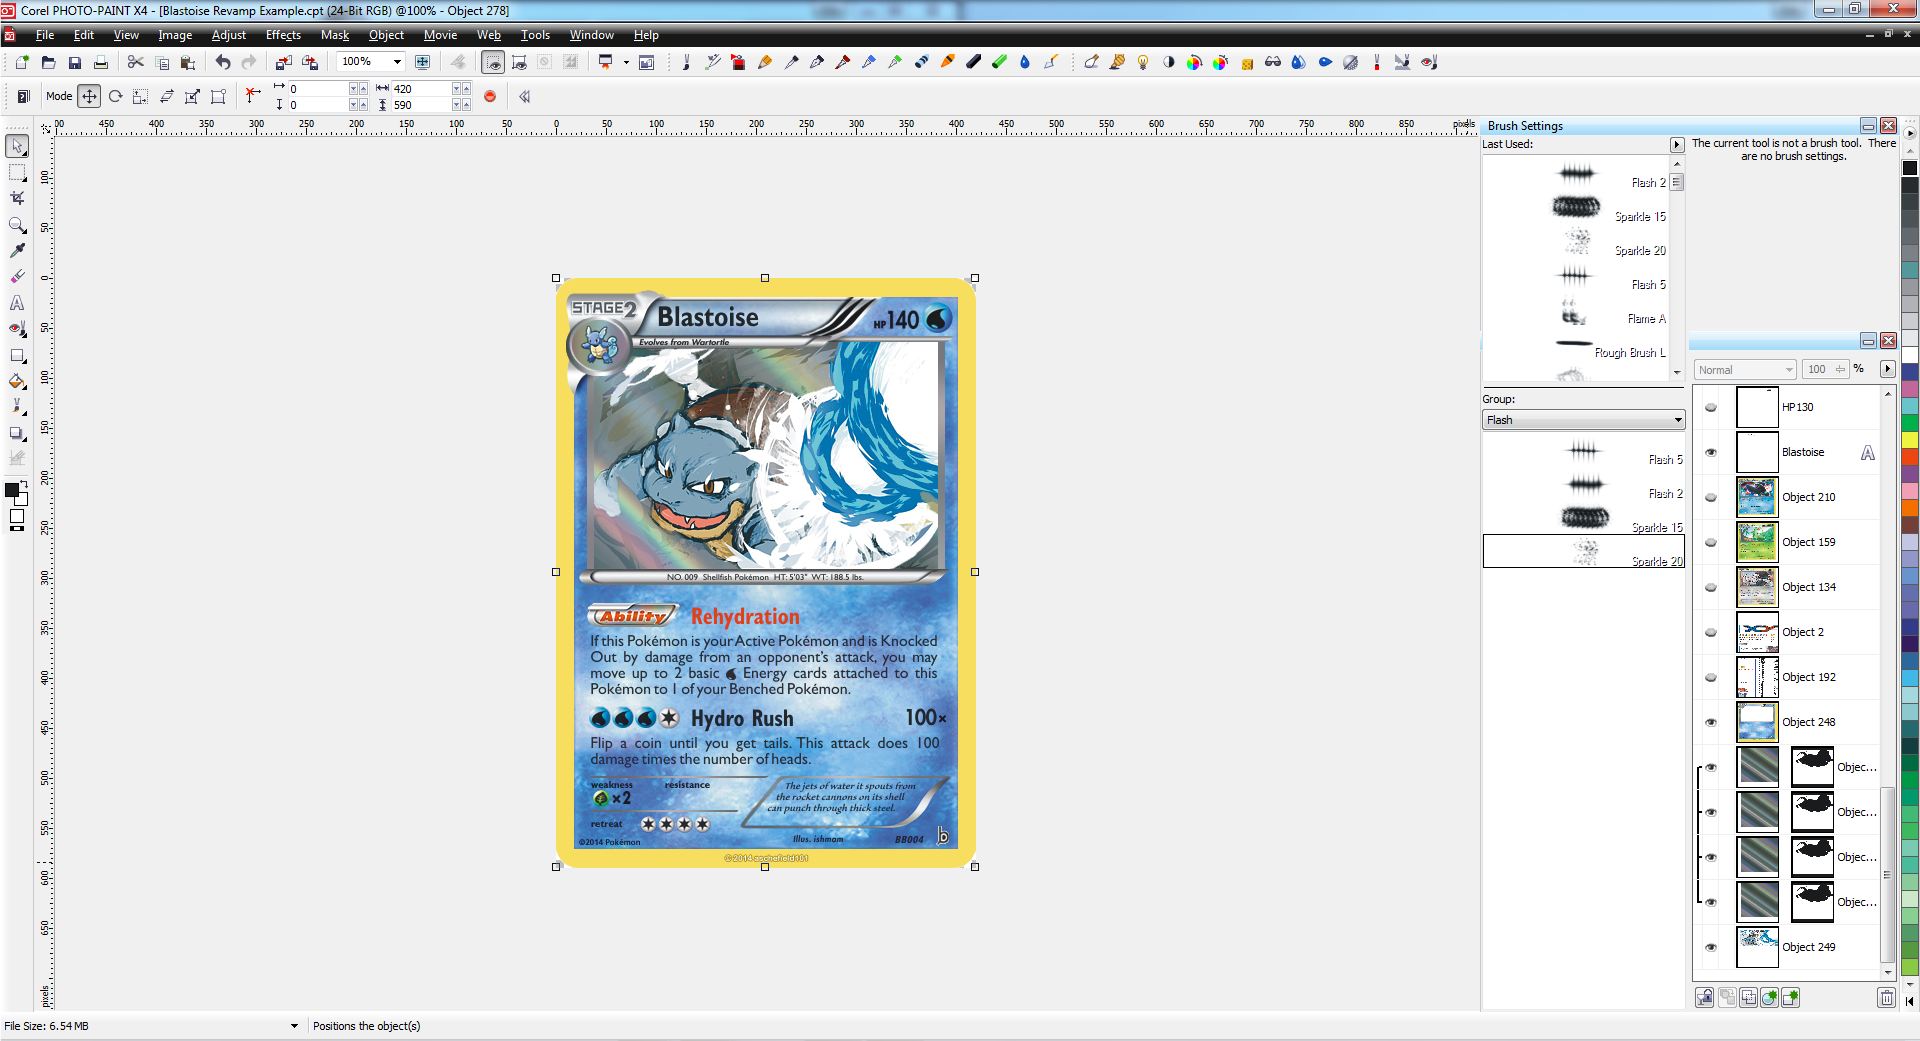
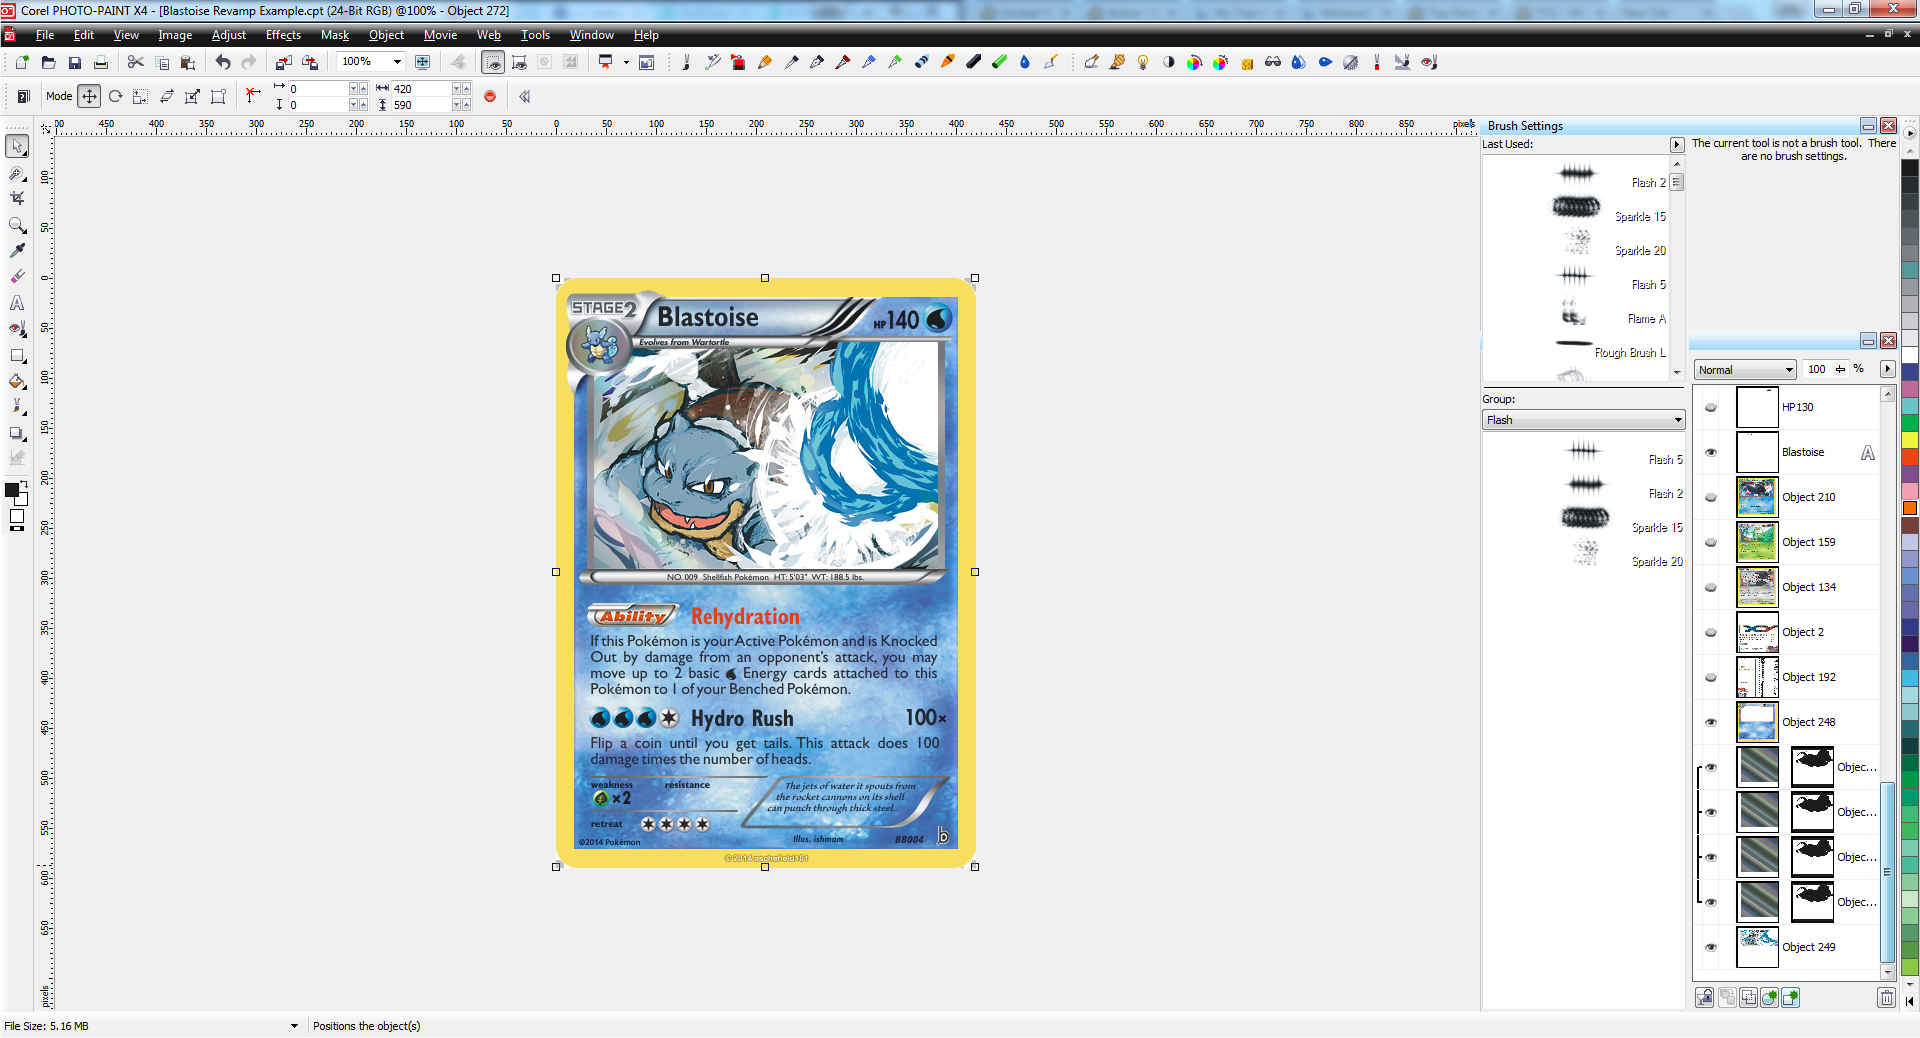
Step 10: Add a holosheet. This is an optional step, and is generally only used if your card is an ultra rare, a rare holo or a promo. Import the holosheet of choice much like you did for the symbol sheet. Position it underneath the blank but on top of the art. Then, erase parts of the holosheet so you can see just the Pokémon and any foreground effects of the art. It would be worthwhile to explore the clipping mask feature that all three software have, as with this feature you are simply removing visibility from certain parts of the layer, rather than erasing it completely. This means you can fix mistakes easier. Note that if your art’s foreground and background are separate, you can simply place the holosheet in between the two layers. Once you’ve erased sufficiently, make one and two more copies of the layer, and name them accordingly.
You would have noticed that at present the holosheet looks pretty awful - you can’t see the background, after all! To make the sheet mostly transparent and to add the holo shine, we will need to use some blending modes. The blending modes will vary depending on the holosheet. The source sheet description may list the best blending modes, however you may have to figure things out yourself. Generally you will end up using a combination of the Multiply and Colour Dodge, and potentially Screen, Soft Light, Overlay, Colour Burn and others. You will also need to adjust the opacity of each layer, if say the holo is too dark or doesn’t give enough colour. Experimentation is the key, but if you’re stuck, ask around - the community will give you tips. Once you’re happy, it’s time to move into finalisation.
Step 11: Proofreading time. You wouldn’t believe how many small mistakes can arise when creating a card. You may forgotten to turn a layer to visible, mistype an attack effect, position something a bit off or forgotten to crop the art so it doesn’t peek around the card edges. Double check - or even triple check - your card for mistakes.
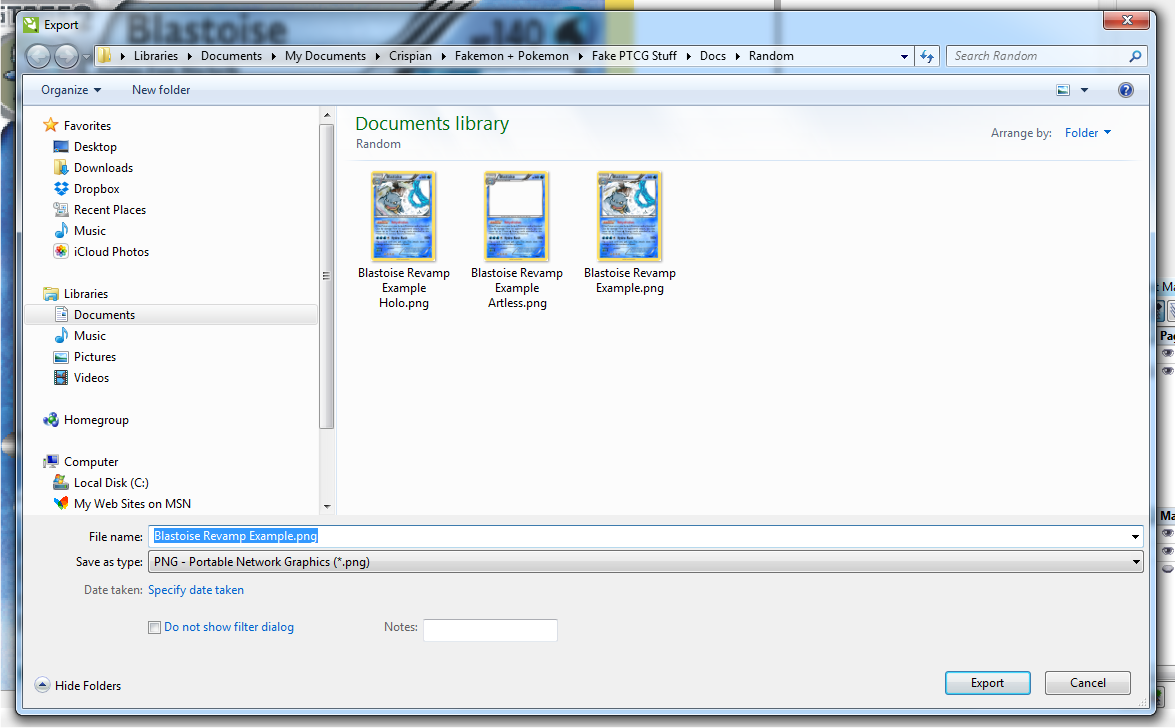
Step 12: Export your card! Finally it is time to export (save) your card as an image! You should export your card as a PNG, as this is the most web-friendly format and has the highest quality. Name it appropriately, and make sure your export dimensions are the same as the original blank dimensions. Also make sure you have a layered version of your card backed up in its original format (.psd, .xcf or .cpt) just in case you want to make changes later.
Step 13: Share your card. Upload your creation to an image sharing such as Imgur or Photobucket, so you can share it to the online world. You may like to upload it to your thread in the Imposter Professor Oak’s Fakes forum, if you have a showcase thread already. If you haven’t created a showcase thread, feel free to make one now.
Tips:
Get familiar with your software of choice. Once you’re familiar, you’ll be able to make cards even more efficiently.
Remember to save your document regularly! Software can crash, and you don’t want to ever lose your progress. Using the Ctrl+S or Cmnd+S shortcuts make saving quick and easy.
Don’t hesitate to refer to multiple scans as references throughout your faking process. You may want to a variety for wording, placements and even art.
Don’t be afraid to experiment with a faking method that works for you best. This tutorial is just a starting point.
Be patient! Once you get the hang of things and/or have designed a template you like, you’ll be able to output cards much quicker.
If you have any questions or are ever stuck, just ask! The TCG faking community always enjoys sharing their tips with new fakers.
Still got to add a list of tips, add screenshots and proofread (or get Thena to proofread :x), but any comments in regards to what has been done already would be great!
I love your banner! Much more PokéBeachy, modern, and fun than mine. I also love that you credited the artist on the banner (doubling as a reminder to always include this on fake cards). If it counts for anything, this one gets my vote!
Added the tips and screenshots to the How To Fake tutorial here. For some reason the screenshots for Step 8 Placements, Step 10a, Step 10b and Step 12 are stuck in their smaller size and won't enlarge like the other screenshots. I'm pretty sure all the screenshots are the same size, so I'm a bit baffled at the moment. :/ Gonna have to look into it in the morning.