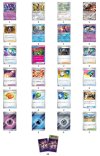
LOST MOON

Pokémon (12):
1 Bloodmoon Ursaluna ex (beatdown)
1 Radiant Greninja (beatdown)
2 Zamazenta S11a (beatdown)
2 Cramorant S11 (beatdown)
1 Sableye S11 (beatdown)
4 Comfey S12a (draw)
1 Ditto SV2 (search)
Trainer (38):
4 Colress Experiment (draw)
2 Boss’ Orders (control)
2 Roxanne (draw)
1 TM Crisis Punch (beatdown)
3 Emergency Board (retreat)
2 Counter Catcher (control)
4 Mirage Gate (accelerate)
1 Unfair Stamp (control)
4 Buddy Puffin (search)
2 Super Rod (retrieval)
3 Switch Cart (retreat)
4 Nest Ball (search)
3 Switch (retreat)
3 Artazon Town (search)
Energy (10):
3 Psychic Energy
3 Water Energy
4 Metal Energy
STRATEGY:
The main idea of the deck is to combine fast and effective beatdown with hand disruption to draw six prize cards as fast as possible. Start with Comfey and use Flower Selecting to draw and fill the Lost Zone. Attack with Cramorant on the first turn and make sure to be able to use Mirage Gate on the second turn to fuel either Zamazenta or Bloodmoon Ursaluna ex. The latter one becomes a nice attacker once the opponent has taken three prize cards and is within Roxanne’s range. Use Unfair Stamp and Roxanne to disrupt the opponent while streaming attackers able to hit for 220 to 280 damage in the second half of the match.
SPOILER:

Bloodmoon Ursaluna ex
Basic Colorless Pokémon
HP: 260
Ability: Elder’s Technique
This Pokémon’s Blood Moon attack costs 1 [C] less to use for each Prize card your opponent has already taken.
[C][C][C][C][C] Blood Moon: 240
This Pokémon can’t attack during your next turn.
Retreat Cost: CCC
Weakness: F
Unfair Stamp
Trainer - Item (ACE SPEC)
You can play this card only if 1 of your Pokémon was knocked Out during your opponent’s last turn. Each player shuffles their hand into their deck. Then, you draw 5 cards, and your opponent draws 2 cards.
CARD SHARK:
Pokémon:
1 Bloodmoon Ursaluna ex: Once the opponent has drawn two to three prize cards he becomes a solid attacker that can ohko Basic Pokémon ex and also reaches Stage 2 Pokémon ex combined with Cramorant or Sableye.
1 Ditto: Turn him into Radiant Greninja or another attacker once searched out with Buddy Puffin.
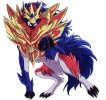
2 Zamazenta: This card is used as one of the main attackers. When a Pokémon has been knocked out Retaliate deals a solid 220 damage to the defender. Metal Shield boosts the hit-points of Zamazenta by reducing damage received in an attack by 30.
2 Cramorant: This Pokémon attacks for free on the first turn due to the Lost Zone mechanic and provides some early game pressure.
1 Radiant Greninja: This card serves as a draw engine in addition to Flower Selecting. It also ensures that there are some basic energies in the discard pile to be used with Raihan. In addition Radiant Greninja provides an awesome snipe attack to hunt down support Pokémon on the bench.
1 Sableye: Lost Mine allows you to place twelve damage counters on the opponent's Pokémon in any way you like once you have ten cards in the lost zone. This allows the deck to hunt down benched consistency Pokémon to draw two prizes at once. In addition Lost Mine can also fix numbers for Zamazenta and Mewtwo.
4 Comfey: Flower Picking is the main draw engine in this deck and can draw two to four cards each turn with the switch and retreat items used in this deck. In addition Flower Picking fills the lost zone and thus activates Lost Supply on Cramorant within one turn and the precondition to use Mirage Gate in one more turn.
Supporter:
4 Colress' Experiment: This card draws five cards from the top of the deck. You can keep three of them and send the other two cards into the lost zone. This is the main draw supporter in this deck.
2 Roxanne: Solid draw and disruption in this deck combined with Unfair Stamp.
2 Boss Order: Gust is needed in almost all decks to ensure board control.
Items and Stadium:
4-4-3 Nest Ball, Buddy Puffin, and Artazon Town: All three cards can be used to search out Basic Pokémon. Nest Ball is the most universal search card but Buddy Puffin can be used to swarm Comfey in the first few turns and also searches out Ditto, who can morph into any attacker.
3-3-3 Switch Cart, Switch, and Emergency Board: Flower Selecting is the main draw engine and the deck needs switch cards and retreat assistance to make use of it.
4 Mirage Gate: This card provides energy acceleration for the main attackers once there are seven cards in the lost zone and also thins the deck to make Flower Selecting more effective.
2 Counter Catcher: Nice control card that combos well with Roxanne and Unfair Stamp.
1 Technical Machine Crisis Punch: Great card to be used with Cramorant.
2 Super Rod: Retrieves discarded energy and Pokémon.
1 Unfair Stamp: Draw and disruption in one card.
Energy:
4-3-3 Metal, Psychic and Water Energy: Basic Energies needed to fuel the main attacker of this deck.
VISUAL DECKLIST:


Pokémon (12):
1 Bloodmoon Ursaluna ex (beatdown)
1 Radiant Greninja (beatdown)
2 Zamazenta S11a (beatdown)
2 Cramorant S11 (beatdown)
1 Sableye S11 (beatdown)
4 Comfey S12a (draw)
1 Ditto SV2 (search)
Trainer (38):
4 Colress Experiment (draw)
2 Boss’ Orders (control)
2 Roxanne (draw)
1 TM Crisis Punch (beatdown)
3 Emergency Board (retreat)
2 Counter Catcher (control)
4 Mirage Gate (accelerate)
1 Unfair Stamp (control)
4 Buddy Puffin (search)
2 Super Rod (retrieval)
3 Switch Cart (retreat)
4 Nest Ball (search)
3 Switch (retreat)
3 Artazon Town (search)
Energy (10):
3 Psychic Energy
3 Water Energy
4 Metal Energy
STRATEGY:
The main idea of the deck is to combine fast and effective beatdown with hand disruption to draw six prize cards as fast as possible. Start with Comfey and use Flower Selecting to draw and fill the Lost Zone. Attack with Cramorant on the first turn and make sure to be able to use Mirage Gate on the second turn to fuel either Zamazenta or Bloodmoon Ursaluna ex. The latter one becomes a nice attacker once the opponent has taken three prize cards and is within Roxanne’s range. Use Unfair Stamp and Roxanne to disrupt the opponent while streaming attackers able to hit for 220 to 280 damage in the second half of the match.
SPOILER:

Bloodmoon Ursaluna ex
Basic Colorless Pokémon
HP: 260
Ability: Elder’s Technique
This Pokémon’s Blood Moon attack costs 1 [C] less to use for each Prize card your opponent has already taken.
[C][C][C][C][C] Blood Moon: 240
This Pokémon can’t attack during your next turn.
Retreat Cost: CCC
Weakness: F
Unfair Stamp
Trainer - Item (ACE SPEC)
You can play this card only if 1 of your Pokémon was knocked Out during your opponent’s last turn. Each player shuffles their hand into their deck. Then, you draw 5 cards, and your opponent draws 2 cards.
CARD SHARK:

Pokémon:
1 Bloodmoon Ursaluna ex: Once the opponent has drawn two to three prize cards he becomes a solid attacker that can ohko Basic Pokémon ex and also reaches Stage 2 Pokémon ex combined with Cramorant or Sableye.
1 Ditto: Turn him into Radiant Greninja or another attacker once searched out with Buddy Puffin.
2 Zamazenta: This card is used as one of the main attackers. When a Pokémon has been knocked out Retaliate deals a solid 220 damage to the defender. Metal Shield boosts the hit-points of Zamazenta by reducing damage received in an attack by 30.
2 Cramorant: This Pokémon attacks for free on the first turn due to the Lost Zone mechanic and provides some early game pressure.
1 Radiant Greninja: This card serves as a draw engine in addition to Flower Selecting. It also ensures that there are some basic energies in the discard pile to be used with Raihan. In addition Radiant Greninja provides an awesome snipe attack to hunt down support Pokémon on the bench.
1 Sableye: Lost Mine allows you to place twelve damage counters on the opponent's Pokémon in any way you like once you have ten cards in the lost zone. This allows the deck to hunt down benched consistency Pokémon to draw two prizes at once. In addition Lost Mine can also fix numbers for Zamazenta and Mewtwo.
4 Comfey: Flower Picking is the main draw engine in this deck and can draw two to four cards each turn with the switch and retreat items used in this deck. In addition Flower Picking fills the lost zone and thus activates Lost Supply on Cramorant within one turn and the precondition to use Mirage Gate in one more turn.
Supporter:
4 Colress' Experiment: This card draws five cards from the top of the deck. You can keep three of them and send the other two cards into the lost zone. This is the main draw supporter in this deck.
2 Roxanne: Solid draw and disruption in this deck combined with Unfair Stamp.
2 Boss Order: Gust is needed in almost all decks to ensure board control.
Items and Stadium:
4-4-3 Nest Ball, Buddy Puffin, and Artazon Town: All three cards can be used to search out Basic Pokémon. Nest Ball is the most universal search card but Buddy Puffin can be used to swarm Comfey in the first few turns and also searches out Ditto, who can morph into any attacker.
3-3-3 Switch Cart, Switch, and Emergency Board: Flower Selecting is the main draw engine and the deck needs switch cards and retreat assistance to make use of it.
4 Mirage Gate: This card provides energy acceleration for the main attackers once there are seven cards in the lost zone and also thins the deck to make Flower Selecting more effective.
2 Counter Catcher: Nice control card that combos well with Roxanne and Unfair Stamp.
1 Technical Machine Crisis Punch: Great card to be used with Cramorant.
2 Super Rod: Retrieves discarded energy and Pokémon.
1 Unfair Stamp: Draw and disruption in one card.
Energy:
4-3-3 Metal, Psychic and Water Energy: Basic Energies needed to fuel the main attacker of this deck.
VISUAL DECKLIST:
