

By: [mod]Xous[/mod]
In this guide I will outline a few basic steps one can take to make artwork in the style of Ken Sugimori, the lead artist of the Pokémon franchise.
In this guide I will outline a few basic steps one can take to make artwork in the style of Ken Sugimori, the lead artist of the Pokémon franchise.


Once I've decided on a Pokémon and a pose to draw it in, I begin sketching. (I just use standard 8.5 x 11" white printer paper.) I normally start by drawing the head and eyes loosely to establish the overall placement of the sketch on paper - this helps me avoid making the sketch too big and having to draw other parts of the Pokémon on separate pieces of paper. Trying to fit all of the Pokémon on one piece of paper is important - draw it too large, and you'll have to assemble its pieces on the computer; draw it too small, and the lines will be too thick after you scan it in. Try to make the sketch large enough to fit evenly across the paper.
Once the head is drawn, I loosely sketch the rest of the Pokémon in the pose I want. It sometimes takes several attempts to get everything to look right, so keeping the lines light enough to erase is important. Once everything looks right, I go back over the loose sketch and darken the lines I want to keep. Some lines don't require this step because of their simpicity. (See the image below.)

Using an "Ultra Fine Point" black Sharpie, I go back over the lines. A steady hand and control over the flow of ink is key here - if your hand shakes too much or the ink bleeds too much, you'll have to go back and fix the line on the computer after you've scanned the sketch in. If I make any errors in the outline I mark them with arrows made in pencil and fix them later after I scan the sketch into the computer.


I scan in the sketch at 150 dpi and open it in Jasc Paint Shop Pro 9. I then zoom in on the sketch and look it over, checking for any specks that may have been caused by the scanner. Taking care of these specks is important - they'll create imperfections in the image later when the outline is finalized.

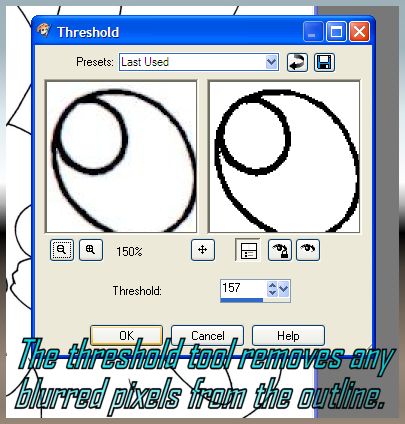
After erasing any specks, I go to Adjust > Brightness and Contrast > Threshold. This step turns all pixels in the image either pure black or pure white - the darker the color, the higher chance it will be changed to pure black. Since the image only consists of the black outline and white background, the outline will be changed to pure unblurred black pixels while the background stays pure white, thus creating a perfectly clean outline that is easy to color in and edit.

In the Threshold window, there is a number you can increase or decrease. The higher the number the thicker the outline will be. If the number is lower, the outline will be thinner. You can decide the best thickness for yourself, but I've found 157 to be the best choice for my work. After clicking "OK," the image is ready to be colored in!

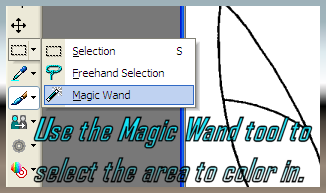
Now that the piece is ready to be colored in, I select the Magic Wand Tool (located with the Selection / Freehand Selection tools, see the image below) and then left-click the section of the drawing I want to color in. As long as there are no openings in the outline the tool with select only within that section of the drawing, which allows you to color in only the sections you want to color in.
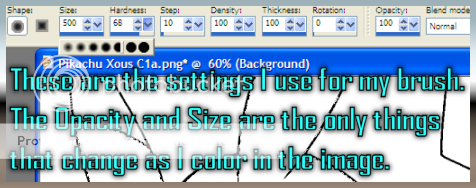
Next, I select the Brush Tool and adjust the settings (seen in the image below). When coloring in a Sugimori-style image, I always use a Hardness of 68, a Step of 10, a Density of 100, a Thickness of 100, and a Rotation of 0 with the Blend Mode set to Normal. The only settings I change while coloring are the Size of the brush and the Opacity. Feel free to experiment with the settings to find what works best for you.
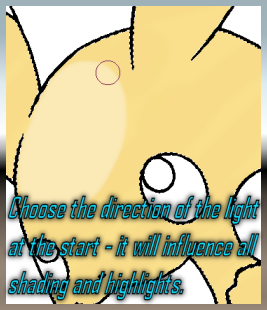
Next, I use the largest brush size possible and put down a base color in the area I've selected. (In this case, it's yellow.) After the base color is down, I begin putting in shadows and highlights. I normally have a good idea of where I'm going to put the shadows and highlights as I'm making the sketch, so from this point on I'm mostly going by instinct. The shading and highlights required in an image vary depending on where your imaginary light source is and the object you're coloring in, so knowing where to put shadows / highlights is just something that takes a lot of practice and cannot be easily explained here.
This part of the process is where it's most important to have a solid understanding of Sugimori's style - it's something that must be practiced and learned. The key to imitating his style is understanding what makes his coloring style unique. One tip I can give is to study his artwork often and take note of how he shades and highlights certain shapes. The shading is very loose - it doesn't necessarily blend perfectly, but instead, the colors gradually overlap each other, leaving distinct lines of separation between them. (See the two images below.)
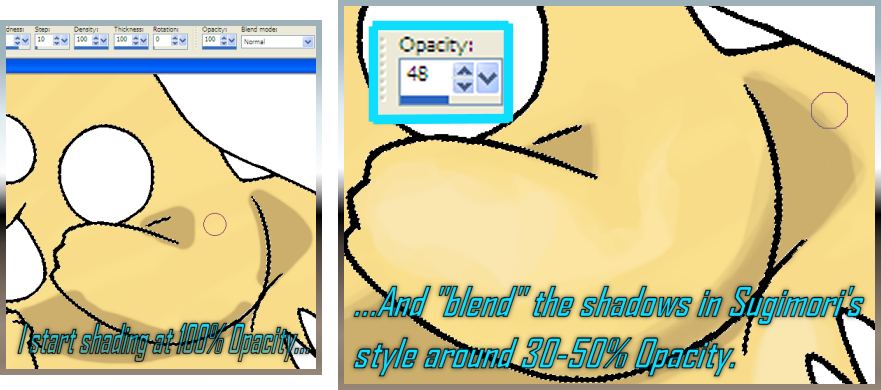
For circular highlights, he tends to overlap the highlight with the base color in circular motions. (See the images of Pikachu's eartips and cheeks below.)

For rounded shadows, he tends to leave a thin line of color between the shaded area and the base color. (See the image of Pikachu's mouth below.) It's hard to explain, but with practice it's a very easy process to get used to.

When coloring in a piece, I normally start with the head and move down, coloring in the sections closest to the viewer first then moving on to parts that are farther away. Doing it this way makes it easier for me to see if the shadows look right.


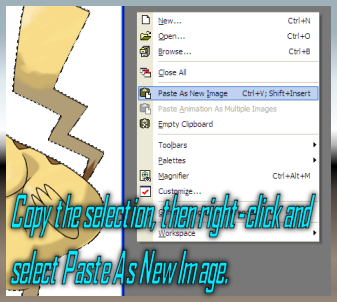
The final step I take to complete my Sugimori-style art is putting the artwork on a transparent background. There are a number of ways to do this with Jasc Paint Shop Pro 9, but this is the way I do it: Select the Magic Wand Tool again and left-click the white background. Since the outline is made up of pure black pixels without any blurring, only the white will be selected, allowing for a clean selection. (If you have any troubles with the Magic Wand selecting other colors, adjust the Tolerance. For this step, I use a Tolerance of 0.) After you've selected all of the white background (make sure you don't miss any spots), go to Selections > Invert. (See the image below.)

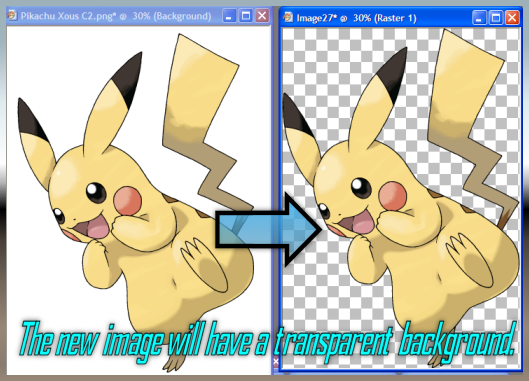
This will make the selected areas reverse - instead of only the background being selected, now only the Pokémon will be selected. Finally, Copy the image (Ctrl + C for most computers), then right-click outside of the image and select Paste As New Image.
That's all there is to it! A new image should be pasted with a transparent background instead of a white background.

I hope you found this guide to be at least a little helpful! If you have any questions regarding anything in this guide, feel free to ask.

- Jasc Paint Shop Pro 9 isn't the only program capable of doing the processes shown here - if you don't have it, there are many other programs out there that can get the job done just as well.
- In the sketching phase, the choice between using a regular pencil or a mechanical pencil is purely up to you. I rarely use regular pencils anymore because I got tired of my sharpeners breaking the graphite.
- When you start outlining with a brand-new Ultra Fine Point Sharpie, you may notice the ink bleeds a lot. As you use the Sharpie more and more the ink will bleed less. I've found that the Sharpies go through three phases before being used up.
- In the first phase, the ink bleeds a lot which can lead to errors in the outline. Don't get discouraged if this happens - everything can be fixed after scanning the sketch in.
- In the second phase, the Sharpie's ink flow is at its best. You should be able to get the width of the lines perfect with no effort, and the number of errors will most likely be very low. Unfortunately this phase doesn't last very long, so take advantage of it while you can.
- In the third phase you may need to work to get the ink to flow, and the width of the lines will be thinner than usual. During this phase I recommend using the Sharpie for fine detail work and using a new Sharpie for the rest of the outlining.
")