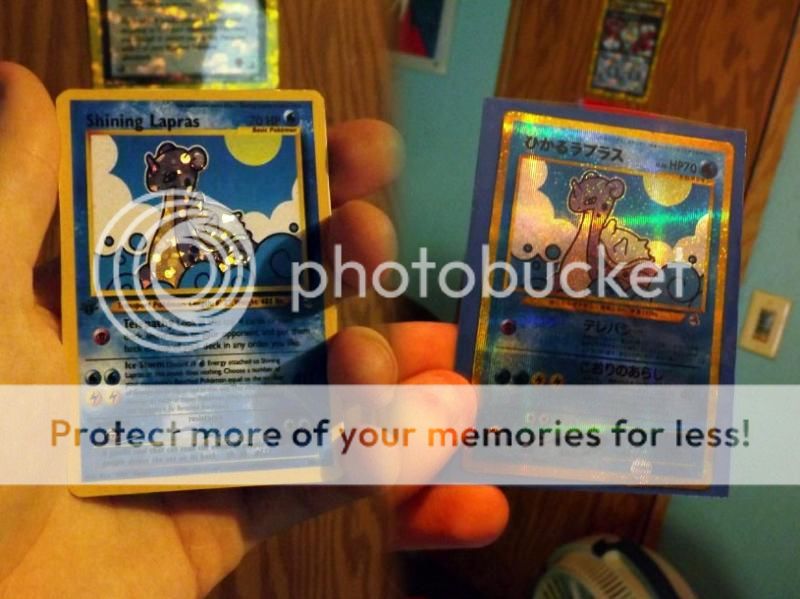
RE: Neko's Random Cards: Shining Lapras (Printed Holos!) 8/21/14
Arcticwhite said:
If that's alright with you, I'd be glad if you could teach me how to print cards like that! I have tried, but so far I've only made 2 decent cards. Nice work, they look so real as always
")
Delta said:
A tutorial would be great. I'd love to print my Medicham card even if it's flawed.
Lapras art is lovely.
Thanks, both of you!
I actually have a tutorial made already, though it's a little outdated (there are a few things I do differently now). It's specifically for Neo-era Shining Pokémon, but some steps can be modified for other types of holographic cards. I'll try typing up a more up-to-date one.
HOW I PRINT HOLOGRAPHIC CARDS
Part 1: Foil (strip those blankin' holos!)
The first thing you want to do if you're making holographic cards is to prepare some blank foils. You could buy foil sheets, holographic paper, or use a foil notebook cover you have laying around, but blank Pokémon foils are more convenient if you want your cards to have the official backing.
To strip a card, dab a cloth in acetone or alcohol and lightly dampen the surface of the foil card. After a minute or so, start scrubbing the center of the card (with the same part of the cloth you dampened it with). Once you start seeing the silver shine though, start working your way outward. Try not to catch the edges with the cloth, else they might peel. Also, don't use too much strength, else you might go right through the foil!
DP-series refractor foils (commonly called reverse-holos) are a lot easier to strip, though. All you need are a pair of tweezers or nail trimmers. Lightly brush a corner of the card with your finger or finger nail until it starts to peel (make sure the shiny part isn't peeling off the card, else you'll need to switch to another corner). Once you see the film separating from the foil, use tweezers or nail trimmers to grab hold of the film and pull it off the rest of the way.
Part 2: Card Resolution (how to make your text crystal clear)
This is the part that many fakers neglect. Many think that, once their card is done, merged, and posted for the world to see that their card can be printed nearly flawlessly at any time, so long as they knew the right settings. This isn't true, though. Even with the best printer settings, a merged card at standard faking size will ALWAYS be blurry or pixelated. Here's how to fix that.
First of all, make sure you save the PSD file (with layers) before merging your file to PNG for online sharing. This way, once you re-size the PSD, all the text will stay crisp. Go to Image > Image Size and change the Resolution from 72 (screen resolution) to 300 (print resolution). Next, change the Document Size to 2.4375" x 3.4375" (if Constrain Proportions is checked, these values may not match perfectly, but that's fine as long as they're no farther apart than 0.1") and click OK. Unfortunately, since it's a raster image, the blank and symbols still come out blurry (it will be less-noticeable in print, but still not perfect). You might want to Patch or Clone out the text on the blank (like WRRC) and type over it to make those parts clear. I think ShiningBill's BW PSD has clipping masks, so it should scale exceptionally well.
(Apr. 2020 update: Luckily, some resource makers now provide larger blanks more suitable for printing, eliminating these extra steps, though you may still have to set the resolution manually depending on the file type.)
Afterward, go to Image > Canvas Size. With the Relative box checked, increase the height and width by 2 percent. Using the Eyedropper Tool, sample the card's border color. Paint over the rounded edges and blank space around the card to make the bleed. (Ignore the parts in italics if you're going to be mounting your card to a holographic sheet instead of a blank holographic card.) After that, go to Image > Mode> CMYK Color. With the Type Tool, select the text boxes (one at a time) and change the color so that the K value in CMYK is 100 (by default, it's probably 90, which actually prints as more of a dark grey). After you have all your text recolored, save your file as something like "[pokemon name]_print.psd," then merge your layers. Save the file again, this time as something like "[pokemon name]_print_flat.png."
Why two files? The PSD is handy to keep in case you notice any problems (like typos) that you'd like to fix later. The PNG is needed because sometimes files with a lot of layers glitch upon printing and come out with weird lines or squares.
Part 3: Printing (paper type and quality)
Note: It's best if you wait until you have 4-6 cards prepared and arrange them on an 8.5" x 11" page so you won't be wasting as many materials.
This part strongly depends on what kind of printer you have and what kind of materials you are using. If you're wanting to print your card non-holo and have an ink-based printer, I suggest using glossy/photo paper. If you're using a toner-based printer, I suggest using card stock. Either way, you're not going to get quite the same finish as real cards (the black ink in particular will be too shiny when tilted around in the light), but they should look fine in sleeves.
If you're wanting to print your cards holo, things are quite a bit more difficult. First of all, you'll need to have the proper materials for your printer model. I use transparency film and adhere it to my foils with spray adhesive, but you can actually find self-adhesive transparencies and printable foil sheets that include film with them. Whichever you're using, follow the instructions included with them. If you're using regular transparency film like me, you'll have to flip your card horizontally so it will print backward.
Regardless of whether you want the foil to cover the whole card or not, you should be ready to print at this point. Go to File > Print. Far to the left, under Color Handling, choose "Photoshop Manages Colors" (this will give you colors closer to what you see on-screen), then hit print. Your printer settings should pop up after that, so select what type of material you're printing on (photo paper, transparency film, etc.) and tell it to print at Best or Maximum quality.
Part 4: Clipping (making select areas of a card holo)
There are a few techniques for making select areas of a card non-holo. While company printers use white ink for this part, most at home printers don't use white ink. The most convenient and accurate at-home method is white-out (or white paint), but this method doesn't work for ink-based printer transparency film (since it causes the ink to run/blur). (The only way it will work for an ink-based printer is if you
don't print the card backward, then apply the white-out/paint on the opposite side of what the card was printed. Just paint over all the parts of the card you don't want to be holo. However, the ink won't be sealed with this method and will be prone to wiping-off or smearing if not kept in a sleeve.)
As for me and my ink-based printer film, we use white paper as a substitute. On the computer, I make a clipping template by outlining the edge of the card and the parts I want holo with a thin grey line, making everything else white. I print this template low-quality to reserve ink. Using an X-Acto knife, I cut out the parts and, with clear spray adhesive, glue the paper to parts of the card I want to be non-holo. It should be noted that, unless you have a very steady hand and knack for working with small things, this method is only ideal for Neo-style Shining cards. It can also be used for Full-Arts, but don't expect the strokes of the text to be non-holo.
Part 5: Completion (the final steps)
Now all you have to do is mount your card and trim it. If you printed a non-holo card, cut it as close as possible to the bleed (don't worry about making it straight). Use an adhesive of your choice (glue stick, rubber cement, spray adhesive, etc.) on the front of an extra Common card. With the printed card face-down, try to center the Common card, also face-down, on the back of the printed card. You can hold it against a light to check if the edges line up how you want. Once you're satisfied, put it inside a thick book and let it dry. After 7-10 minutes, get it out and trim along the edge of the official card. You've finished your non-holo card! Put it in a sleeve or binder for safe-keeping.
If you printed on film, you'll want to do pretty much the same thing, but with a blank foil card (or holographic sheet) and you HAVE to use clear spray adhesive (other glues will make your foil look milky and less shiny). If you used a holographic sheet instead of a blank foil card, try cutting as closely and straight as possible to the edge of the border. Congrats! You now have your own custom holographic card. The film makes it a little glossier than normal cards, like it's laminated, but it's your baby, so treasure it.
EDIT: Added a link to this tutorial to the first post.